Saturday, October 30, 2010

So I had this idea for a cute outfit for my neice for her birthday party today. I picked out a pink polk-a-dot. and brown... it is her mom's favorite together. So I took a white t-shirt and cut a square top. To tell you the truth my mom did all of the work because she is the best. So this is how the shirt turned out. We rolled hem the sleeves and added some elastic. The brown is an inset. And my mom made this cute flower with a button.

I made the skirt. I took an idea for a circle skirt and added a band.

And here is the complete outfit... I think that it is fit for the princess and her party.

Friday, October 29, 2010

Last Minute Halloween

Are you in search for a Halloween candy bucket for your kids. . .
If you order a kids meal at McDonald's, the kids get there meal in that bucket!!  They are super cute and the perfect size for getting candy!  Plus they get to decorate it with potato head stickers! If you don't need one for Halloween, kids still love buckets. . .right??

Wednesday, October 27, 2010

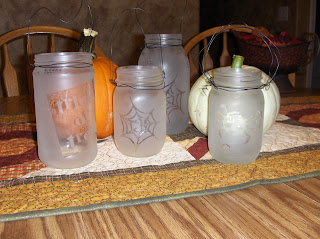
Spooky Lanterns

So every year our church does a Trunk-or-Treat. And we needed a few things to spice up our trunk. I thought it would be cute to make some spooky latern.  They would look better with some light in them, but we did not have any tea lights. Some creepy music and some fake spider webs and we are set. Oh, and don't forget the jack-o-laterns that we will be carving on Friday.

Re-using Clothes

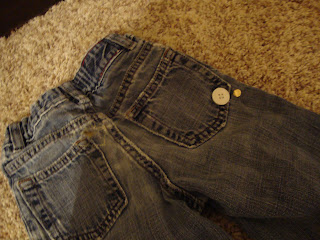
It's that time of year to go through kids close and get rid of summer stuff and pull out the fall clothes.  I had some pants that my youngest boy worn last year, but has now grown out of.  By the look of these pants, most of you would probably just get rid of them, but I knew I could make them cute for my youngest to wear, which was in need of pants anyway.
 First I cut them down to the length I needed.  The style of the torn jeans is in right now, so I knew I could get away with the holes in the knees, and around the pockets.  I had some yellow polka-dot fabric laying around, that I just love, so I put that behind the holes, so no diapers would be showing through. I added ruffles to the bottom of the legs, with the same fabric.  My plan was to make it match with a shirt she already had, so I added some gold and white embellishments, with these. . .
Do you remember these from the eighties??!!!  I had a few laying around, and they were perfect for this project.


I didn't get a picture of her in them, but she sure looks cute!  What clothes are you going to re-use today?

Tuesday, October 26, 2010

An Idea For a Place Mat Top

Cut your table mat to the size you want. Draw with a pencil the design you want.

Buy transparent fabric paint, in the colors you want.

Paint the image. I found that if you are messy and do not stay in the lines it turns out better.

I took metallic frabric paint to outline my leaves. I think it turned out pretty... Happy Painting.

Monday, October 25, 2010

Educational Pumpkins

As we were cutting pumpkins tonight, I came up with a great idea for carving!
I cut the top like you do to get all the goopies out, scooped out all the goopies, and then cutting around the pumpkin I cut layers, so that it would turn into a puzzle for Princess Lolly.  I took my potato peeler and peeled the skin off of every other layer.  I think this is such a great idea for this age group, because they love to play with the pumpkins.  You could also cut shapes out around the pumpkin and then use the shapes that you cut out to use as a matching-push through-game! Have fun carving!

Friday, October 22, 2010

Eggless Never Fail Pie Crust

Alright so 'tis the season for baking. It is cold outside and warm yummy treats sound great. I have gotten this recipe from my mother... and it is so wonderful. You can never fail on this crust, and it always turns out beautiful.
3 cups of flour
1 1/2 cups of shortening
1 teaspoon of salt
6 tablespoons of water
3 tablespoons of vinegar
You combine your dry ingredents into a bowl. Cut in the shortening until it is crumbly. Then add the liquids and mix do not knead a lot or it makes the crust too hard. Just mix until completely mixed. This pie crust is not a sweet pie crust, it has more of a tangy flavor. But that is what we like with the sweet gooey insides.

How to cook a pumpkin

I love the taste and smell of fresh pumpkin.  Most of us use the stuff in the can, but here is instructions on how to get the "real" pumpkin taste in your recipes.

First you'll need to buy pie pumpkins.  They are the littler ones, and should be labeled as such at the store.  When you get home pre-heat oven to 350 degrees.  Then cut them in half, I was able to bend the stem off after cutting them, this makes it easier to fit them all on the pan.  After cutting them in half scrape out the seeds and goo.  Lay them face down on a pan.  I used my biggest cookie sheet.  Put the cookie sheet in the oven and add water to the bottom of the pan.  I put in about 4-5 cups of water. (Just put in enough to cover the bottom, but not coming over the sides.   
Cook for about 45 minutes to an hour, depending on the size of the pumpkins.  I usually feel the pumpkins.  When the are soft and squishy to the touch the are done.

Pull them out of the oven and turn over to let them cool down.  When the are cool enough to touch peel off the skin and put the pumpkin into a blender.

Blend it up nice and smooth.  I divided mine out into little Tupperware, and freeze mine. My two pumpkins I bought made 8 cups of pumpkin.  So each pumpkin makes about 4 cups, if you buy the size I did.   I used real pumpkin in my pumpkin pies last year and they tasted great!  You can also use this in pancakes, Cinnamon rolls, and I am going to make some pumpkin bread in a few days. . .enjoy!

Thursday, October 21, 2010

Sweet As Candy

So here we have Princess P sporting the latest Halloween attire. Candycorns are very in this year and as you can see she is making this work!

Here is the close up of the skirt (tutorial to come later, so keep checking back).

An adorable candycorn applique that would complete any Halloween look.

And lastly a bow to pull the look together.

Wednesday, October 20, 2010

Goodie-Goodie-Gumdrops

My second youngest is going to be Jolly for Halloween.


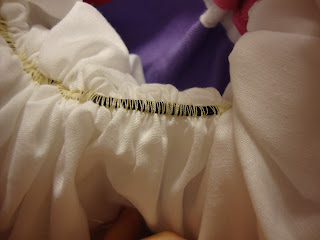
I used the same pant pattern as I did for Mr. Mint and just cut it shorter and added some elastic to the bottom of the legs.  I ironed on pink spot using heat and bond.   For the collar, I used a really long and skinny piece of white fabric.  I added pink to the edge, and then down the middle used elastic to gather the fabric, by zig-zagging over the elastic (which makes a casing of thread)-be careful not to catch the elastic, or it won't scrunch or stretch right for you.

For Halloween I will probably color his hair purple, and color his nose purple, and I think get some purple tights.  I still have to figure out what to do for his shoes. . .
Again my husband thinks he looks like a girl, but this is probably the last Halloween that my kids are going to let me dress them up, so I'm having fun with it :)

Tuesday, October 19, 2010

Rinestone Flower Bow

I am selling these rinestone flower bows. They come in 5 different colors of your choice. They are 5 dollars for a set of two, or 3 for one plus shipping. E-maol me at kissing.frogs6@gmail.com if you are interested.

Monday, October 18, 2010

Continuation of Candyland

My second oldest is a boy and he is going to be Mr. Mint for Halloween.
This is so so easy and it turned out really cute. . .but I'm a little bias :)
For the pants (which i think I need to make a little shorter, or gather them) I just used an easy pant pattern, and then added strips for fabric for the straps. 
I made the "socks" by just using leftovers from the hat and sewing it together to form a tube.  I spray painted some old shoes red.

I made cute little buttons to cover up the seams and to add a little bit of fun to it.  My husband thinks I am dressing my boys up like girls . . .but it's candyland and I think he looks handsome :)

The hat is my favorite part, but was by accident it turned out this way.  I first made a tube type hat, and when I was done I thought it looked to much like Cat-in-the-Hat so I pulled the top together to get a little pom-pom effect.  The kids are so excited for Halloween, come back later this week to see what my two youngest are going to be!! :)

Saturday, October 16, 2010

The Prince is Exterminating

Okay sorry this post is so late, but I had to add a few finishing touches on the Prince of Persuasions costume.
Since Princess P is going as a fly her older brother is going as an exterminator. We couldn't get a good picture of the whole costume, because he kept moving.


 I also made him a little hat with a free pattern I found online.

Then I put his company on his coveralls.

We made his bug sprayer out of a pop bottle and some vinyl. I think it turned out pretty good, and he can shoot water out of it too. Which he thinks is so cool!

Friday, October 15, 2010

Halloween Bouquet

These fun things are actually made out of my kids hand prints.  So this would be a fun Halloween gift along with a treat for Grandparents.  My kids helped me with this project, and for age, I would say this would be best for 4 and up.  My three year old LOVED it, but I had to help him with every step.  My 4 year old was able to trace and cut his own hand out.  Anyway if you really wanted to get fancy you could use dowels for the stems, to make them a little more sturdy to use year after year.

First you trace and cut out a hand. 
 Then using a pencil curl the fingers.
 The you will want to roll the hand up so the fingers are curled outward, and stick a pipe cleaner through the hole at the bottom of the rolled up hand.  I just used what I had around, but it would be fun to use black.
 Use a stapler to hold it together down at the bottom.
We added eyes at the bottom to hold them in and some glow-in-the-dark paint to the leaves to make them look really eerie :)-

Thursday, October 14, 2010

10 Tips in Getting Organized and Staying There

So people who know me call me somewhat of a minimalist. I enjoy the fact that I am a minimalist, everything is in is place and I don't have a lot of stuff. Now my sister would tell you growing up I was not like this, I was not an organising minimalist. Though through the years for some reason or another I have become such. So I would love to share the knowledge that I have and hopeful it will help in your endeavours! I find that I need fall cleaning and spring cleaning... so because of where I live it is just now feeling like fall. And that irritating feeling of everything needs to be in is place is creeping in!

1. When organizing, group stuff together
2. I find using clear storage containers help you to know what is in there and if it needs to be cleaned out!
3. Label everything
4. Closets are not the best for storing, if you have other options like an attic or a garage use those first
5. If you only have closets, clean it often, and make sure stuff as not got pushed to the back that you cannot see.
6. Things that are used often keep toward the front
7. If you need to stack up, stack things on top that you use more often
8. Keep holiday decoration out in the garage, and keep them in order of holiday
9. When it comes to kids clothes keep them in boxes of size
10. Keep it up!

So here are my tips I hope it will help!

Tuesday, October 12, 2010

Princess/Queen Crown and Wand

My children this year are going to be characters from the board game Candyland.  My oldest is a girl and she is going to be Queen Frostine.

For her dress I used an old bridesmaids dress and cut it shorter and added some white fluff.  Nothing to extreme, but I ended up making her wand and crown, so I thought I would share how to make an easy crown and wand, for any kind of princess.

I lost my camera so the pictures of the steps are also lost, so I am going to do my best to explain without them. 
For the crown, I took a plastic headband that I had and formed out of wire the shape of the crown.  I glued the crown form to the headband.  I cut strips of the same white fluffy fabric I used on the dress, and wrapped the fabric around the wire and headband.  Every so often I would secure the fabric with a little thread.  After I wrapped the fabric, I wrapped some beads I had leftover from another project.
For the wand I also formed the design out of wire, and wrapped it the same way as I did the crown, but for the handle I used a dowel so it would be a little more sturdy. My Queen Frostine loved how it turned out!
This would even be fun to make for birthday or Christmas gift for any girl who loves to play dress up!

Spooky Boxes

Okay so here is a cheap cute idea. The box is forever old, but here is a new spin and a new design. These boxes are super easy to make. I decided to make mine out of double sided Halloween paper!

Stables add a fun element and help keep the box together. Plus it is super fast. If you fold it the oppisite way you get the short fat box. I put some candy and ripped up paper to fill the box.

I also have a template for a box with a lid! Add a cute little ribbon, and you have a fun little gift box you can make for your kids friends, or it is so easy they can do it!

First you cut out the template.

Then you fold each side toward the center. You do this on all four sides.

Then you put the sids of the box together so that the triangle is on the outside of the box.

You press it over, and you can tape, glue or stable it.

Here is the PDF of the file of the boxes. You can make them for any occation. They also make great party favor boxes!